Left Continue shopping
Your Order

You have no items in your cart

Free Shipping on orders $49+

Blog

Ayurvedic Kitchari with Cilantro Honey Chutney

Ayurvedic Kitchari with Cilantro Honey Chutney

Celebrate National Soup Month with this easy, delicious and healthy kitchari! This recipe incorporates Ayurvedic spices known to help reduce inflammation, improve digestion and more. 

Topped off with a delectable Cilantro Honey Chutney that brings just the right amount of sweetness, this soup is the perfect dish to help you meet your 2021 goals!

Ingredients:

  • 1 cup moong dal (dry)
  • 1/2 cup basmati rice (dry)
  • 1 tsp cumin seeds
  • 1/4 tsp turmeric powder
  • 1 tsp Pacific Resources International Sea Salt
  • 1/2 tsp pepper 
  • 1/2 tsp cardamom 
  • 2 tbsp coconut oil 
  • 1 tsp ginger
  • 1 tsp garlic 
  • 5 cups water 
  • Vegetables of choice (we used zucchini, kale and carrots) 
  1. Rinse moong dal and rice a few times until water is clear.
  2. 2. In a large pot, place spices and oil and cook until aromatic (make sure not to overcook the spices).
  3. Next add 5 cups of water and 1 cup of moong dal and ½ cup basmati rice. Give it a good stir and add in your finely chopped vegetables.
  4. Cook on medium/high until it starts to boil. Place the lid on and reduce to a simmer and let it cook for 35-40 minutes or until the rice and moong dal are mushy. Serve immediately and enjoy with a generous amount of cilantro honey chutney.

Cilantro Honey Chutney 

  • 1 bunch cilantro 
  • Juice of two lemons 
  • 1 pinch of sea salt 
  • 3 tbsp Pacific Resources International Australian Organic Raw Honey or Manuka honey 
  • 1/4 cup shredded coconut 
  • 2 tbsp toasted coconut flakes
  1. Combine all ingredients in a food processor except the toasted coconut flakes.
  2. Pulse until well combined to the consistency you prefer.
  3. Add in the toasted coconut flakes last and pulse a few times. Serve on top of the kitchari and enjoy!  
Read more
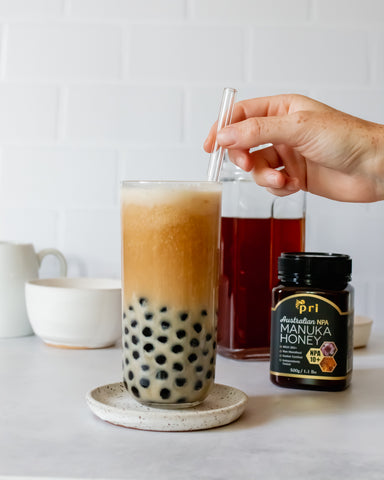
Boba Tea with Honey Sweetened Condensed Milk

Boba Tea with Honey Sweetened Condensed Milk

We made Boba Tea healthy and your life is now complete!


Ok, that last part might be a bit of an exaggeration but what isn’t exaggerated is how terrible the store bought boba tea is for you. Typically containing a ton of processed non-organic sugar, chemical flavorings and sometimes even artificial colorings, this delicious concoction should normally be enjoyed only as a very occasional treat.

Well, not anymore!! We used organic earl grey tea but you can use any tea you like or even coffee. The real secret is the dairy free manuka honey “condensed milk”. We used our Australian Manuka as it has more of a caramel flavor than the NZ varieties but really, you could use any manuka honey for the taste and health benefits!


Boba Tea with Honey Sweetened Condensed “Milk”

Makes: 1-2 large drinks


Ingredients:

Black Tea:
4 bags of Organic Earl Grey Black Tea (or any organic tea of choice)
2 cups boiling water
1 tsp PRI Australian Manuka Honey (optional)


Boba:
1 cup dried tapioca pearls
10 cups water
1 tbsp PRI Australian Manuka Honey

Coconut Honey Condensed Milk:
1 - 5.4oz can coconut cream (We used Native Forest; keep the cream from the top, discard liquid)
¼ cup PRI Australian Manuka Honey


Instructions:
Place 4 tea bags in a pot and fill with 2 cups of boiling water. Let it steep for 5-10 minutes, add in the honey when hot and stir. Set aside.
In a large pot, bring 10 cups of water to a boil, slowly pour in 1 cup of tapioca pearls. Once the boba begins to float to the top cover with a lid for 2-3 minutes. Turn the heat off and cook for an additional 2-3 minutes. Strain excess water and transfer the boba into cold water so it doesn’t stick together, let it sit for 30 secs to 1 minute. Strain water. Add 1 tbsp of honey to the boba and stir.
In a high speed blender, combine the coconut cream with ¼ cup manuka honey. Make sure you use just the cream and discard the liquid from the can. Blend on high until it resembles the texture of condensed milk. Feel free to add more or less honey based on taste preference.
In a tall glass, pour in boba, ½ cup ice cubes, black tea, and honey coconut condensed milk. Enjoy!

Read more
Manuka Honey For Burn Treatment

Manuka Honey For Burn Treatment

For centuries, Manuka Honey has been popular for its antiviral, anti-inflammatory and antibacterial properties. It is generally used for treating wounds, burns, and other many other conditions both internal and external. Using Honey can accelerate healing, pain relief and decreased inflammatory response. You can apply a thin layer of Manuka Honey on a bandage before putting it on the affected area. 

Manuka Honey is produced by the bees from the nectar of the Manuka Tree that originated from New Zealand and Australia. MGO stands for Methylglyoxal, it is the compound that makes Manuka Honey unique. Manuka is the only honey that exhibits non-peroxide activity due to the MG component that is present. Manuka honey comes in a range of MGO ratings. The higher the number on the label, the higher the concentration of MGO. For external uses, especially for burn treatment, we recommend an MGO rating of at least 200+. 

Burn is a damaged tissue, after contact with heat and this can happen in many circumstances. Burn treatment depends on the type of burn. There are four types for burns below. 

  • First-Degree Burns or Superficial Burns are mild. These cause pain and reddening of the outer layer of skin or epidermis.
  • Second-Degree Burns or Partial Thickness Burns affect the outer layer of the skin or epidermis and lower layer of the skin or dermis. These cause pain, redness, swelling, and blistering.
  • Third-Degree Burns or Full Thickness Burns go through the lower layer of the skin or dermis and affect deeper tissues.
  • Fourth-degree burns go even deeper than third-degree burns and can affect your muscles and bones. Nerve endings are also damaged or destroyed, so there’s no feeling in the burned area.

It appears that using Honey can heal Superficial or Partial Thickness Burns and when applied to the skin it helps to regenerate burn surface or tissue forming in wounds, reducing infection, providing relief and speeds up the healing process. 

If you feel your burn is severe, or just aren’t sure, please seek medical attention.


References:

https://www.ncbi.nlm.nih.gov/pmc/articles/PMC3941901/

https://www.ncbi.nlm.nih.gov/books/NBK78502/

https://pubmed.ncbi.nlm.nih.gov/25742878/

https://www.webmd.com/pain-management/guide/pain-caused-by-burns

https://www.ncbi.nlm.nih.gov/pmc/articles/PMC6023338/

Read more
Carrot Bacon BLT

Carrot Bacon BLT

Pardon us saying so but this B.L.T. is…. dynamite! 


We put a spin on the classic for National BLT Month because we honestly believe that our favorites can be made healthier and if we can make them healthier, we can enjoy them more often. That’s called winning! 

The savory notes of our Leatherwood Honey and smokiness of our Mesquite BBQ Salt really complete the flavors of the carrot bacon. Even staunch disbelievers will love this sammie and the chef will appreciate that it takes about 30 minutes to whip up including the marinate time!!! You can also do this in the oven.


Carrot Bacon BLT


Ingredients:

Carrot Bacon:

  • 2-3 large carrots

Marinade:

  • 1 tbsp liquid smoke
  • 1 tbsp PRI Leatherwood Honey 
  • ¼ tsp PRI Mesquite BBQ Salt 
  • ½ tsp garlic 
  • ½ tsp onion powder
  • ¼ chili powder
  • ¼ back pepper

Sandwich Ingredients:

  • Sandwich Bread
  • Tomatoes
  • Lettuce
  • Mayo (regularly or dairy-free)

Instructions:

  1. With a vegetable peeler, shred the carrots lengthwise until you get large thin strips of carrots.


   2.In a bowl, combine the liquid smoke with honey and mix. Next, add in the        salt and spices. Mix until well combined. Let it sit for a few minutes.  


  3.Transfer the carrots into the bowl and let them marinade for 10 minutes.


    4.Place the carrots in the air fryer and bake at 380 for 6 minutes. If you want them extra crispy add an extra minute.


5.Toast your bread, spread on vegan mayo, place your iceberg lettuce, tomatoes and finish with the carrot bacon. Enjoy!


Read more
Chocolate Caramel Popcorn

Chocolate Caramel Popcorn

What’s poppin’ friends? Caramel popcorn that’s what!! In honor of National Caramel Day, Caramel Popcorn Day and, of course, our new Manuka Caramel Chocolates, we wanted to whip up this incredibly tasty, easy, healthier snack option. 

Add some fun sprinkles and voila - the perfect dairy and gluten free Easter treat! 

Speaking from experience, we can also tell you that you could use any of our new (or OG) manuka chocolate flavors with great success! You could even mix up flavors like caramel with coffee….ooooh, brb... having a sudden snack attack!!


Chocolate Caramel Popcorn

  • 1 bag PRI Manuka Honey Caramel Chocolates
  • 4 cups popcorn (popped popcorn) or ¼ unpopped
  • Natural sprinkles of choice

Instructions:

  1. Prepare a baking sheet with parchment paper or a silpat mat.
  2. Use microwave popcorn or  pop it on the stove like we did with 3 tbsp oil. Transfer to a large bowl.
  3. Melt the chocolate caramels in a double boiler on the stove, while regularly stirring until completely melted.
  4. Pour the tempered caramel chocolate over the popcorn in the bowl and stir with a spatula until the popcorn is covered in chocolate.
  5. Transfer popcorn onto the cookie sheet and let cool.
  6. Place popcorn back in the bowl and pour your sprinkles over. Enjoy! 

Read more
camping made easy

Camping Made Easy


At Pacific Resources International, we’re firm believers in the healing benefits of mother nature. Packing up and going camping is a great way to get away from everyday stresses in life but like any other trip, you need to be prepared to get the most out of your experience. Make sure to check these off of your list before heading out to the woods for your next camping trip!

Camping Gear

Braving mother nature is easy when you have the right camping gear. First things first, you’re going to need a place to sleep. Make sure to invest in a quality camping tent and sleeping bag to assure that you get the full amount of Z’s needed to keep you going through your camping adventures. Once you’ve got your camping set up together, make sure you pack away a flashlight and some extra batteries to light the way- you never know when things are going to get a little dark in the great outdoors!

Snacks

Camping can be exhausting and the last thing you want to worry about is whether or not you have enough to eat. The number one rule for staying energized while camping is: don’t forget the snacks! We like Proper Crisps– they’re an all natural, perfect grab and go snack for when you’re on the go. If you’re looking for something a little sweeter, try some Manuka Honey Sticks! They’re small, portable, and oh so tasty!

Wellness 

While camping can be fun and relaxing, it can also be dangerous. Make sure that you’re prepared for any accidents with the right topical solutions. Campfires can be dangerous but are essential for camping. If you’re planning to light a fire during your camping trip, you can’t afford to not have quality Wound and Burn Dressing for any potential accidents that may happen while lighting your campfire! Planning on an all day hike? You can use Nectar Balm for any aches, pains, bruises, or sprains you may encounter on the way. Lastly, dry weather can seriously cause discomfort while outdoors so make sure to pack some Manuka Oil for your drying scalp and Manuka Honey Lip Balm for cracked lips. Happy camping!

Read more
manuka honey

Buyer Bee- Ware!

BY PETER BERK

FAKE MANUKA HONEY CONTINUES TO SATURATE U.S. MARKET

With more consumers learning about the considerable culinary and wellness attributes of New Zealand Manuka Honey every day, it’s no surprise that numerous brands are trying to capitalize on this lucrative trend by offering knock-off products that deflect their lower quality by selling for a lower price.

Indeed, not only are many of these brands making highly questionable authenticity claims on their labels that fall well short of New Zealand’s strict industry guidelines, but some are even sold in clear bottles despite the fact that Manuka honey is extremely light sensitive.

Why We Shouldn’t Count on Pollen Counts                                             

Among the most troubling developments in the “fake Manuka” category, today are brands which try to validate the purity and effectiveness of their products by relying on pollen counts (i.e. K Factor) and other grading systems as a supposedly authoritative form of testing.

For consumers seeking high-quality Manuka honey products from New Zealand that can enhance their cuisine and potentially improve their health, a high pollen count would, on the surface, seem to make perfect sense. Honey. Bees. Pollen. What could possibly be wrong with that equation?  

As it turns out – a great deal.

UMF – the Certified Gold Standard                                                                                              

According to John Rawcliffe, General Manager of New Zealand’s respected Unique Manuka Factor (UMF) Honey Association, developing a fool-proof definition of Manuka honey has proven easier said than done over the years, but pollen counts (the measurement of the concentration of pollen trapped in honey) are certainly not the answer.

The independent UMF certified labs of New Zealand test every batch of Manuka honey for its potency, purity, and effectiveness — not once but three times to ensure accuracy. The lab measures the active and leptosperin content of Manuka that determines its unique antibacterial properties. Other sellers of Manuka use pollen count like K Factor, which is a misleading and ineffective designation and devoid of any medicinal attributes.

Moreover, UMF labeled products should have a lab tested batch number on each jar. Some UMF suppliers do NOT test every batch and therefore can’t supply a Certificate of Analysis for each jar.

Read more
Easy DIY Manuka & ACV Cuticle Oil

Easy DIY Manuka & ACV Cuticle Oil

This is the cuticle oil for longer, stronger nails & healthy cuticles, .naturally! We all have had cuticle and nail issues and understand we need to take care of them…but what really are the purpose of our cuticles?

Cuticles are actually part of your skin that grows over the bottom of your nail and covers your nail matrix. The nail matrix is the part of your nail that grows so, the cuticle acts as a very important protective barrier for your nails!


This cuticle oil is  a SUPER simple DIY & another great natural health hack!  All you need is:

  • Manuka Honey - (1) Honey is a humectant, which basically means it locks in moisture. (2) Manuka is also full of antibacterial and anti-inflammatory properties.
  • Manuka Oil - (3) Shown to be 33x more effective against most bacteria than tea tree oil & also helps retain moisture. It can also help with brittle nails.
  • Coconut Oil AND
  • ACV - Both of these ingredients are packed with essential nutrients to help keep your nails strong and repair chipped or brittle nails.

All of these ingredients work together to create a hydrated nail bed, free from invasive bacteria and fungus. Simply mix the ingredients together and you’re done! While you can get inexpensive cuticle pens online and in lots of stores it is optional, just make sure you store the oil in a container with a lid. 

Simply rub into your cuticles and nails, leave for 10-15 minutes and rinse! Do this daily or, if you have problem nails, up to 3x a day.

Resources:

(1) https://www.ncbi.nlm.nih.gov/pmc/articles/PMC5038978/

(2) https://www.ncbi.nlm.nih.gov/pmc/articles/PMC3941901/

(3) https://www.ncbi.nlm.nih.gov/pmc/articles/PMC7694078/


Read more
Decadent Chocolate Rice Cakes with Manuka Honey!

Decadent Chocolate Rice Cakes with Manuka Honey!

Out of all the creative ways to eat rice cakes, this is one of our favorites! We are constantly experimenting with our fun & flavorful Manuka Honey chocolates and this recipe is simple and perfect for kids & adults alike. This recipe will work especially well as an after school snack! 

Chocolate & strawberries pair well together in so many applications so we had to include them in this recipe! This goes without saying that Manuka Honey and strawberries also go together very well. Putting all of them together is a recipe for success! 

To make this rice cake recipe even more special, we included a variety of nuts that help add a saltiness that boosts the flavor profile of our chocolate rice cakes. Of course, this is in addition to the tremendous nutritional value in nuts (if you’re not allergic).

Coconut flakes are also a delicious topping for this snack! If you’re a fan of toasting your coconuts before adding them as a topping, feel free to take the extra time to do so. It should only take a few minutes to get a light toasting on them, or you can buy already toasted coconut shavings if you want to save time!


Ingredients

Produce

  • 2 tbsp dried strawberries
  • 2 tbsp Goji berries

Baking & Spices

Nuts & Seeds

  • 2 tbsp Coconut flakes
  • 2 tbsp Pumpkin seeds

Bread & Baked Goods

  • 12 Brown rice cakes

RECIPE

  1. Melt about 10 Raspberry Manuka Honey chocolates in a bowl
  2. Apply melted chocolate to rice cakes
  3. Arrange toppings to your liking!

If you’ve never tried our Manuka Honey chocolates on their own, they’re delicious in their own right! We like to treat our unique & healthy Manuka Honey treats as versatile snacks that can be used in so many recipes. Our chocolate flavors now include Salted Caramel, Coffee, Ginger, Mint, & Raspberry -- all of which can make for great options in this recipe and many more!

We crafted our special Manuka Honey chocolate patty recipe to be gluten-free & dairy-free without artificial colors, flavors, or preservatives so they can be healthy as possible & diet-friendly! 

Read more
Dairy-Free Spicy Mexican Chocolate Soft Serve

Dairy-Free Spicy Mexican Chocolate Soft Serve

When we saw that National Soft Serve Ice Cream & National Hot & Spicy Food Day were on the same day you KNOW we had to get on that mash-up!


It was super difficult to decide which flavor to create, but we ended up settling on spicy mexican chocolate because the ingredients were most accessible and, well, who doesn’t love chocolate? 


Soft serve is actually really easy to make without any fancy gadgets. If you don’t have a piping bag, just cut the corner off of a ziploc!


Dairy-Free Spicy Mexican Chocolate Soft Serve 
Serves 2-3

Ingredients:

  • 1 can Heavy Coconut Cream
  • 1/2 cup Full Fat Coconut Milk
  • 1/4 cup PRI Manuka Honey 5+
  • 1 tbsp cinnamon 
  • 2-3 tsp cayenne pepper (or more if ya like it hot AND spicy!)
  • 1 tbsp espresso or coffee powder (optional)
  • 1 cup dairy-free dark chocolate chips 
  • 1 tbsp vanilla extract 

Instructions:

  1. In a medium saucepan, bring full fat coconut milk and manuka honey to a boil. 
  2. Once boiling, reduce the heat immediately to a simmer, then remove from heat.
  3. Pour in the chocolate chips, stirring until the chocolate is completely melted and combined with the coconut milk honey mixture.
  4. Let the mixture cool for 10 minutes and then stir in the cinnamon, cayenne, espresso and vanilla. Stir until well combined.
  5. Next, pour the mixture into ice cube trays or candy molds and freeze overnight until hard.
  6. The next day, remove the chocolate cubes from the molds and place them in a high speed blender or food processor and blend until you have a thick soft serve texture. Do not add any excess liquid, you may need to use a tamper or scrape the sides down.
  7. Transfer the batter to a piping bag with a star tip and pipe the soft serve onto a cone into a cup, if the batter is too frozen let it thaw a bit, if it’s too runny to pipe, place back into the freezer until it is your desired consistency.
  8. Enjoy!


Read more
Cocktails To Try This Holiday Season!

Cocktails To Try This Holiday Season!

Here are three classic Holiday cocktails to try this season! 

BEE’S KNEES

This classic prohibition-era cocktail that is simple, clean and refreshing.

INGREDIENTS

  • 2 oz Gin
  • .75 oz Fresh lemon juice
  • .5 oz Manuka Honey syrup (one part honey, one part water)
  • Garnish – Lemon twist

PREPARATION

Add all ingredients to a shaker and fill with ice. Shake, and strain into a chilled cocktail glass. Garnish with a lemon twist.

MEXICAN PUNCH PONCHE

A warm, deliciously fruity, naturally sweetened punch perfect for the holidays!

INGREDIENTS

  • 20 cups (1 1/4 gallons) water
  • 2 sticks cinnamon
  • 5 ounces sugar cane peeled and cut into matchsticks
  • 5 ounces tamarind peeled
  • 5 dried hibiscus flowers 
  • 1 orange peeled and cut into quarters
  • 2 pounds apples unpeeled,cored, and sliced
  • 1 pound guava fruit 
  • 10 tejocotes (hawthorne apples) sliced
  • 1 cup New Zealan Multiflora Honey
  • Fresh fruit for garnish
  • Tequila to taste, optional (recommended)

PREPARATION

  1. In a large stock pot, bring water, cinnamon, sugar cane, tamarind, and hibiscus flowers to a boil. Reduce heat and simmer until the water turns dark brown, about 10 minutes (depending on your cinnamon sticks, the Ponche may be a pinkish color).
  2. Add oranges, apples, guava, and tejocotes and continue simmering 1 1/2 hours longer. Strain. Add honey to taste. Add Tequila (if you want to!) Garnish with fresh fruit and serve.

HOT TODDY CIDER

A Sweet Twist on a holiday classic.

INGREDIENTS

  • 10 oz apple cider
  • 2 cinnamon sticks
  • 2 star anise
  • 8 whole cloves
  • 11/2 Tablespoon New Zealand Multiflora honey
  • 4 oz honey whiskey, or whiskey of choice
  • 1 Tablespoon lemon juice

PREPARATION

  1. Ina sauce pot, combine apple cider, cinnamon, star anise, and cloves. Bring to a boil.  Remove from heat and cover with a lid.  Allow spices to steep for 10-15 minutes. 
  2. Strain spices. Stir in honey to dissolve. Add whiskey and lemon juice. Stir to combine.Add more honey according to taste, if desired. Serve with sliced apples, sliced lemons, cinnamon sticks, and star anise.
Read more
Edible Flower Honey Shortbread Cookies

Edible Flower Honey Shortbread Cookies

What food most says Spring to you? For us, it’s shortbread. We don’t know what it is, but the turning of the season makes us crave these buttery, flakey treats so we just had to share our favorite recipe! 

With the simple addition of edible flowers, these classic cookies are instantly made into a feast for both the eyes and the tastebuds. Make them gluten-free, dairy-free, paleo or..none of the above - any way you go they’re sure to impress your Easter guests!

Edible Flower Honey Shortbread Cookies 

These delicious cookies are perfect for spring time and can be made both dairy-free and gluten-free! Use grass-fed butter for a paleo option.

Ingredients:

  • ½ Cup Vegan Butter Or Grass-fed Butter
  • ½ Cup PRI Manuka Honey 5+
  • 2 Tsp Vanilla Extract
  • 1.5 Cups Cassava Flour (Add In 1 Tbsp At A Time If Needed)
  • ¼ Tsp PRI Fine Sea Salt
  • 1 Egg (Egg White Only) + 1 Tbsp Cold Water
  • 1-2 Packages Of Edible Flowers

Instructions:

  1. In a stand mixer using the paddle attachment, combine softened butter with manuka honey and vanilla. Whisk until the butter and honey are incorporated. You will need to scrape down the sides continuously.
  2. Next, add in the cassava flour and sea salt and continue beating until a dough ball forms. If the batter is too wet add 1 tbsp of cassava flour at a time, if it’s too dry at 1 tbsp of honey at a time.
  3. Place the dough ball in plastic wrap and let it chill for at least 20 minutes.
  4. Preheat the oven to 350F. Place parchment paper or a silpat mat on two baking sheets.
  5. Roll out the dough on parchment paper and use a cookie cutter for your desired shape. The cookies should be at least ¼ inch to ⅜ thick.
  6. Place them on the baking sheets spread out, but these cookies will not spread.
  7. Whisk the egg whites of one egg with 1 tbsp cold water. Use a brush to brush on the egg wash on the cookie and then place an edible flower on top. Finish with more egg wash to seal it in.
  8. Bake for 12 to 14 minutes, or until the edges become golden. 
  9. Finally, let the cookies cool on a wire rack and enjoy!

Read more
156 results